Getting three bids for a waterproofing project sounds straightforward until you realize each one describes a completely different scope of work. One contractor quotes interior drainage only. Another includes exterior excavation. A third bundles everything into a single line item with no breakdown. When you need to evaluate waterproofing contractor bids, the challenge isn’t just the price. It’s figuring out whether you’re even comparing the same job. This guide walks you through a practical, step-by-step process to compare waterproofing estimates fairly, spot red flags early, and choose a contractor you can trust to do the work right.
Table of Contents
Key Takeaways
| Point | Details |
|---|---|
| Scope clarity beats price | Itemized bids let you compare actual work, not just dollar amounts. |
| Normalize before comparing | Adjust each bid to reflect the same assumptions before drawing conclusions. |
| Red flags cost more later | Vague descriptions and missing warranties signal future disputes and surprise charges. |
| Budget for contingencies | Set aside 10 to 15% above your bid total to cover unexpected findings mid-project. |
| Verify before you sign | Confirm licensing, insurance, references, and written warranties before awarding any contract. |
How to evaluate waterproofing contractor bids the right way
Before you can assess contractor bids fairly, you need a working understanding of what waterproofing actually involves. Without that foundation, you’ll struggle to tell a thorough proposal from a vague one.
Common waterproofing methods and what they cost
Waterproofing is not one single service. Contractors use different approaches depending on where water is entering, how severe the problem is, and what your budget allows. Here are the main methods you’ll encounter:
-
Interior drainage systems: Channels installed inside the basement perimeter to redirect water to a sump pump. Less invasive than exterior work, but manages water after it enters rather than stopping it at the source.
-
Exterior waterproofing membranes: Applied to the outside of the foundation wall after excavation. Exterior membrane systems cost $150 to $250 per linear foot and offer a 20 to 30 year lifespan.
-
Crack injection and repair: Polyurethane or epoxy injected into foundation cracks to seal them from the inside or outside.
-
Drainage board and grading: Exterior solutions that redirect surface water away from the foundation before it reaches the wall.
-
Sump pump installation: Often paired with interior drainage to actively remove collected water.
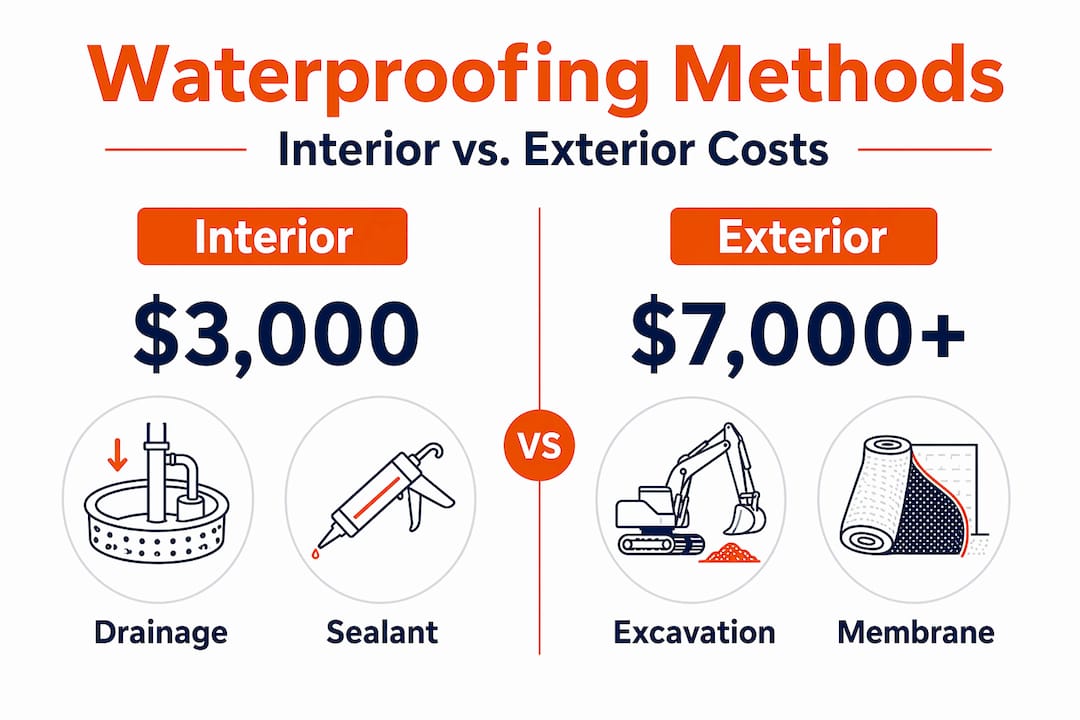
In 2026, basement waterproofing costs range from roughly $3,000 for interior methods to $7,000 or more for exterior excavation and drainage work. Complex projects involving major structural repairs or large square footage can reach $20,000 or beyond.
What drives the cost of your project
Several factors push waterproofing costs up or down. The size of your foundation perimeter, the severity of water intrusion, soil conditions, and accessibility all affect labor time and material needs. Permit requirements in your city or county add cost too, and they vary significantly across states like Texas, Florida, California, Arizona, and Colorado.
Comprehensive waterproofing estimates should be itemized with line items including demolition, drainage materials, membrane products, labor, permits, and overhead. When a bid lacks this detail, you have no way to know what you’re actually paying for.
Setting your scope before bids arrive
Before you invite contractors to inspect your property, document what you know. Note where water appears, how often, and after what conditions. Take photos. Measure the affected areas. This gives every contractor the same starting point and reduces the chance that each one scopes the job differently based on their own assumptions.
Step-by-step: comparing waterproofing bids fairly
Once you have bids in hand, the real work begins. Here’s how to assess contractor bids in a way that actually produces a useful comparison.
-
Map each bid to a scope block. Break every bid into the same categories: problem diagnosis, exterior water management, foundation access or excavation, crack repair, interior drainage, sump pump work, and cleanup or restoration. Itemizing each bid this way lets you see exactly what each contractor includes and what they leave out.
-
Normalize the assumptions. Two bids can look very different simply because one contractor assumes two cracks and another assumes five. Adjust each bid to reflect the same conditions. If a contractor excludes a scope block entirely, add a placeholder cost based on market rates. This technique, known in construction as using “plug numbers” for excluded scope, reveals the true comparable cost and prevents you from awarding a contract to someone who simply left items out.
-
Build a comparison matrix. Create a simple table listing each scope block down the left side and each contractor across the top. Fill in what each bid includes, excludes, and prices for that block. This format makes gaps obvious at a glance.
-
Check warranty terms line by line. A 10-year warranty that covers only labor is not the same as a 10-year warranty covering both labor and materials. Look for whether warranties are transferable to a future buyer, which matters significantly if you plan to sell the property.
-
Evaluate contractor qualifications. Price is one factor. Schedule availability, years of experience with your specific method, references from similar projects, and documentation practices are equally important. Bid evaluation should weigh schedule fit, prior performance, and financial stability alongside cost.
Here’s an example of what a basic comparison matrix looks like:
| Scope block | Contractor A | Contractor B | Contractor C |
|---|---|---|---|
| Problem diagnosis | Included | Included | Not listed |
| Interior drainage | $2,800 | $3,100 | $2,400 |
| Sump pump | Included | Add-on: $650 | Not included |
| Crack repair (2 cracks) | Included | $400 extra | Included |
| Cleanup and restoration | Included | Not included | Included |
| Warranty | 10 years, transferable | 5 years, labor only | 10 years, non-transferable |
| Normalized total | $5,800 | $6,750 | $5,900 |
Pro Tip: The biggest mistake in waterproofing project cost analysis is assuming that a lower number means a lower cost. Once you add plug numbers for excluded scope, the cheapest bid often becomes the most expensive.
Red flags and common mistakes when assessing bids
Understanding waterproofing quotes means knowing what a bad one looks like. These are the warning signs that should make you pause before signing anything.
-
Vague scope language. Phrases like “seal cracks as needed” or “waterproof basement” with no quantities, methods, or materials specified are red flags. Clear, itemized proposals reduce the risk of hidden costs and disputes after work begins.
-
No written warranty or unclear terms. A verbal promise of “lifetime coverage” means nothing without documentation. Read the warranty document before you agree to anything.
-
Missing insurance or license information. Any contractor who cannot provide proof of general liability insurance and a valid state contractor’s license is a liability risk for you as the property owner.
-
Suspiciously low bids. A bid that comes in 40% below the others usually means something is missing from the scope, not that you found a bargain. Cross-reference it against your comparison matrix to find out what was left out.
-
No contingency discussion. Waterproofing projects regularly uncover mold, additional cracks, or deteriorated drainage that wasn’t visible during inspection. Budgeting 10 to 15% contingency above your total bid is standard practice for this reason.
-
Pressure to decide immediately. Contractors who push for a same-day decision or offer discounts that expire in 24 hours are using a sales tactic, not offering genuine value.
Pro Tip: Ask each contractor to walk you through their inspection findings verbally before you receive a written bid. Contractors who trace water entry points with evidence and explain their reasoning clearly are far more likely to produce accurate, trustworthy proposals.
Verifying and finalizing your contractor selection
Once you’ve done your analysis and identified a preferred contractor, a few final steps protect you before any work begins.
-
Request a detailed written contract. The contract should include the full itemized scope, specific materials and products, start and completion dates, payment schedule, and warranty terms. Nothing discussed verbally should be left out of the written document.
-
Verify licensing and insurance. Check your state’s contractor licensing database directly. In Texas, Florida, California, Arizona, and Colorado, licensing requirements differ, so confirm that the contractor holds the right credentials for your specific project type.
-
Call references from similar projects. Ask references specifically about how the contractor handled unexpected findings mid-project. That’s where you’ll learn the most about how they actually operate.
-
Clarify the change order process. Agree in writing on how changes to scope will be priced and approved. A clear change order protocol prevents disputes if the project expands after work starts.
-
Confirm cleanup and post-installation support. Know exactly what the contractor will restore after the work is done. Some bids include drywall patching and floor restoration. Others leave that entirely to you.
Getting these details in writing before the project starts is what separates a smooth waterproofing project from one that ends in disagreement.
My honest take on evaluating waterproofing bids
I’ve reviewed a lot of waterproofing bids over the years, and the pattern I keep seeing is this: homeowners focus on the bottom-line number and skip the scope entirely. That’s where the real money gets lost.
The most revealing moment in any bid comparison is when you normalize the assumptions. I’ve watched bids flip completely once you add plug numbers for excluded scope. The contractor who looked cheapest suddenly costs $1,500 more than the one who seemed expensive. That reversal happens because one contractor was transparent and the other was strategic about what to leave out.
What I’ve also learned is that the inspection conversation tells you more than the written bid. When a contractor walks through your basement and can explain exactly where water is entering, what’s causing it, and why their approach addresses the root cause, that’s a contractor worth paying attention to. When they hand you a one-page quote with three line items and a big number, that’s a problem waiting to happen.
The clients who get the best outcomes are the ones who ask hard questions before signing. They ask what happens if more cracks are found. They ask whether the warranty transfers. They ask for the names of two homeowners with similar projects. That due diligence takes maybe two extra hours. It can save you thousands.
— Jack
Find licensed waterproofing contractors through Usaconcretejobs
Sorting through bids is much easier when you start with contractors who are already vetted. Usaconcretejobs connects homeowners and property managers with licensed waterproofing specialists across Texas, Florida, California, Arizona, and Colorado. Every contractor in the network carries proper licensing and insurance, so you’re not starting from scratch on verification.
Whether you need interior drainage, exterior membrane work, or foundation crack repair, Usaconcretejobs makes it straightforward to get free estimates from qualified local contractors. If you’re in Colorado, you can connect directly with local concrete professionals who understand regional soil conditions and permit requirements. Submit your project details and get bids you can actually compare.
FAQ
What should a waterproofing bid include?
A complete waterproofing bid should include itemized line items for diagnosis, drainage materials, labor, permits, and cleanup, along with written warranty terms. Vague scope language like “seal as needed” is a red flag.
How do I compare waterproofing estimates fairly?
Build a comparison matrix that maps each bid to the same scope blocks, then add estimated costs for anything a contractor excluded. This normalized comparison reveals the true cost of each proposal.
Why is the lowest waterproofing bid often a bad choice?
Low bids frequently exclude scope items that other contractors include. Once you account for those gaps, the lowest bid often ends up costing more than a mid-range one that covered everything upfront.
How much should I budget for waterproofing contingencies?
Budget an additional 10 to 15% above your total bid amount. Waterproofing projects commonly uncover mold, additional cracks, or drainage problems that weren’t visible during the initial inspection.
What credentials should a waterproofing contractor have?
Contractors should hold a valid state contractor’s license for your state, carry general liability insurance, and be able to provide references from similar waterproofing projects completed in the past two years.